
You've spent years building SEO equity. Thousands of backlinks. Hundreds of ranking keywords. Steady organic traffic that drives 40% of your revenue. Then you migrate to a new platform and watch it all disappear in 30 days.
This isn't hypothetical. Studies show that 30–50% of e-commerce sites experience significant organic traffic drops post-migration due to technical errors. Broken redirects. Lost metadata. Canonical tag misconfigurations. URL structure changes that Google interprets as new, unproven pages.
The good news? Every one of these failures is preventable with a proper SEO migration checklist. This guide walks you through the exact 4-step framework that protects your rankings, preserves your organic traffic, and ensures your migration strengthens your SEO position instead of destroying it.
If you're planning a platform migration and SEO is a meaningful traffic source, this SEO migration checklist is non-negotiable.
Table of Contents
What Is an SEO Migration Checklist and Why 50% of Sites Lose Traffic Without One?
An SEO migration checklist is a structured, step-by-step process for preserving search engine rankings and organic traffic during a platform migration. It covers pre-migration audits, redirect implementation, metadata preservation, and post-launch monitoring.
Without a checklist, teams miss critical steps. A forgotten redirect map. Metadata that doesn't carry over. Canonical tags pointing to old URLs. Each mistake compounds, and Google responds by demoting your pages or deindexing them entirely.
Why SEO Migration Fails? The Three Most Common Mistakes
1. Incomplete 301 redirect mapping
Teams map major pages (homepage, category pages) but miss product pages, blog posts, or regional URLs. Result: 404 errors, lost backlink equity, and ranking drops for hundreds of pages.
2. Metadata doesn't migrate
Page titles, meta descriptions, alt text, Open Graph tags, these don't automatically transfer. Teams assume the new platform preserves them. It doesn't. Google sees pages with generic or missing metadata and deprioritizes them.
3. No post-launch monitoring
The site goes live. The team celebrates. Two weeks later, organic traffic is down 30%. By then, the damage is done. Without Google Search Console monitoring and immediate issue resolution, small errors become catastrophic.
A proper website migration SEO checklist eliminates these risks through systematic validation at every stage.
Many e-commerce sites lose rankings due to broken redirects, missing metadata, and a lack of monitoring, issues that can all be avoided with a proper framework. Semrush’s website migration checklist provides an excellent complementary reference to this process.
Step 1: How to Map Your URLs Before Migration. The Foundation of SEO Preservation.
URL mapping is the foundation of your SEO migration checklist. Every URL on your old site needs a corresponding destination on your new site. Miss one, and you lose that page's SEO value permanently.
Crawl Your Current Site Completely
Use a tool like Screaming Frog, Sitemap Generator, or your existing sitemap to export every indexed URL. Don't rely on memory or manual lists; crawl comprehensively.
What to capture:
- All product pages (including out-of-stock and archived products)
- Category and collection pages
- Blog posts and content pages
- Landing pages (including old campaigns)
- Regional or language-specific URLs (if applicable)
Export this as a spreadsheet. You now have your source URL inventory.
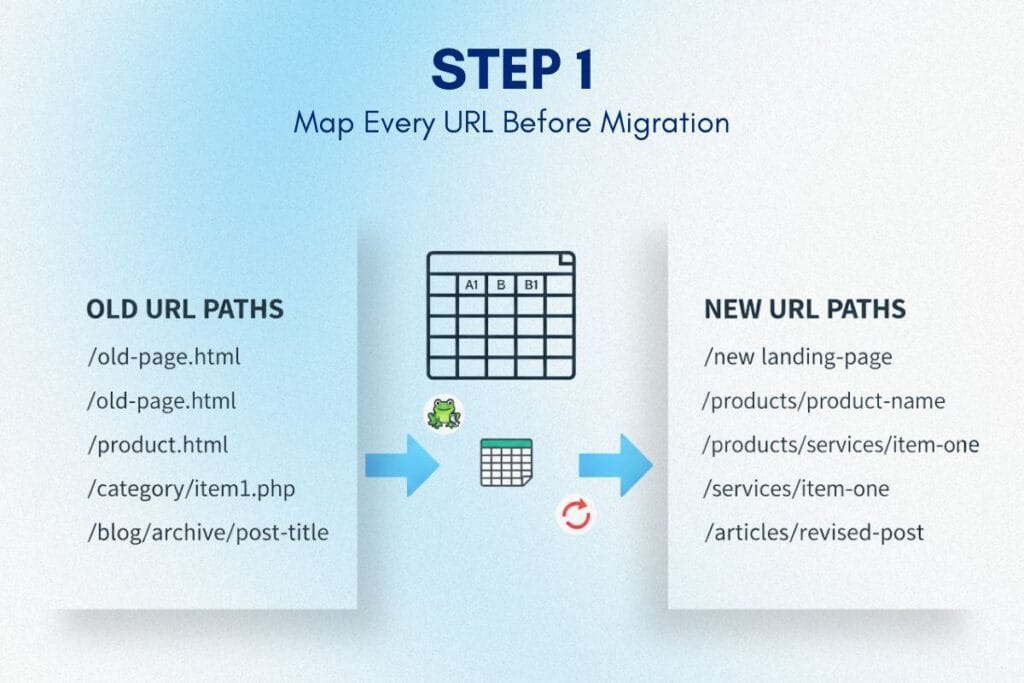
Map Old URLs to New URLs (One-to-One)
For each old URL, determine its new URL on the target platform. This is manual work, but it's the most critical step in your site migration SEO checklist.
Common URL structure changes:
- Old: /product-name.html → New: /products/product-name
- Old: /category/product → New: /collections/category/product
- Old: /blog/2023/post-title → New: /blog/post-title
Some pages won't have direct equivalents. Decide now: does this page redirect to a similar page, a parent category, or the homepage? Document every decision.
Validate That New URLs Are Live in Staging
Before migration, ensure every new URL exists and loads correctly in your staging environment. Test a sample of 50–100 URLs manually. Use automated checks for the full list.
Why this matters: If you redirect to a URL that doesn't exist yet, you create a 404 error chain. Google penalizes this heavily.
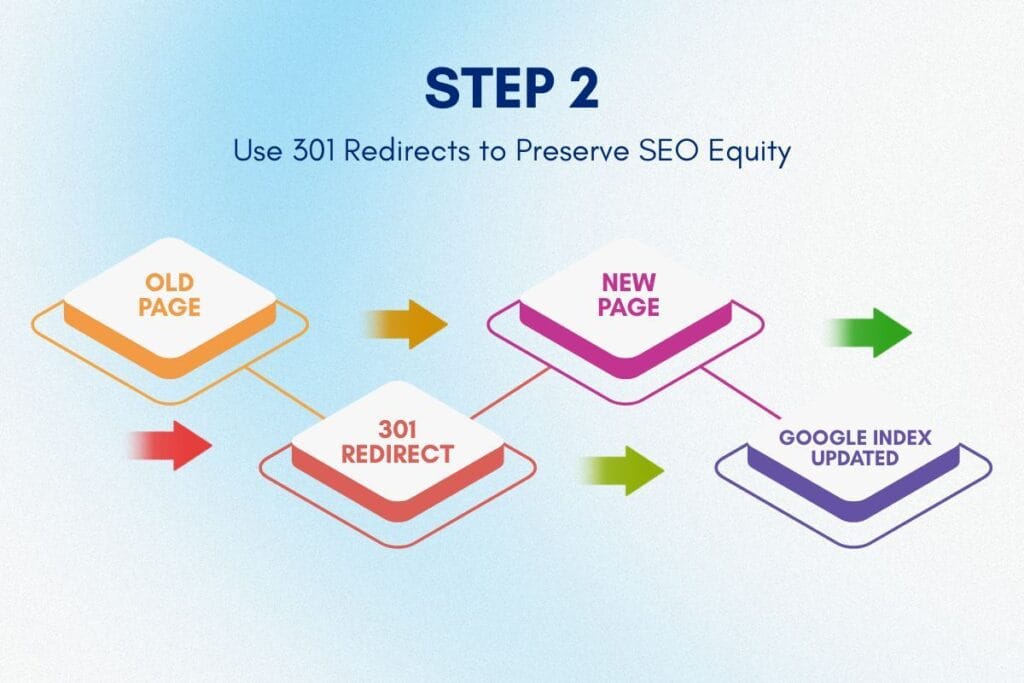
Step 2: What Are 301 Redirects and How to Implement Them Without Losing Rankings?
A 301 redirect tells search engines: "This page has permanently moved to a new location." It transfers 90–99% of the old page's SEO equity (backlinks, authority, ranking signals) to the new page. For official best practices, refer to Google’s guide to site moves and URL changes.
Without 301 redirects, Google treats your new URLs as entirely new pages with zero authority. Your rankings reset. Organic traffic collapses.
Implementing 301 Redirects Correctly
Server-level redirects (preferred method):
Implement redirects at the server or CDN level. Shopify Plus supports URL redirect management natively. For other platforms, use .htaccess (Apache) or nginx.conf (Nginx) configuration files.
Why server-level wins: Faster execution, more reliable, and Google trusts them more than JavaScript or meta refresh redirects.
Redirect rules structure:
Redirect 301 /old-product-page.html https://newsite.com/products/product-name
Redirect 301 /old-category/ https://newsite.com/collections/category-name
Repeat this for every URL in your mapping spreadsheet. For large sites (10,000+ URLs), use wildcard rules or regex patterns where applicable, but validate each pattern carefully.
Testing Your Redirects Pre-Launch
Before go-live, test every redirect:
- Use a redirect checker tool (Screaming Frog, Redirect Path Chrome extension, or online tools)
- Verify each old URL returns HTTP 301 status and lands on the correct new URL
- Check for redirect chains (Old URL → Temporary URL → Final URL). These dilute SEO value. Redirect directly to the final destination.
A comprehensive SEO migration checklist includes testing 100% of redirects before launch, not after.
Common 301 Redirect Mistakes to Avoid
Redirecting everything to the homepage: This is lazy and destructive. Google sees it as a soft 404. Always redirect to the most relevant equivalent page.
Forgetting query parameters: URLs with parameters (?color=red, ?size=large) need individual redirect rules if they're indexed. Check Google Search Console for parameter-based URLs before migration.
Ignoring trailing slashes: /products/item and /products/item/ are different URLs to servers. Ensure consistency in your redirect map.
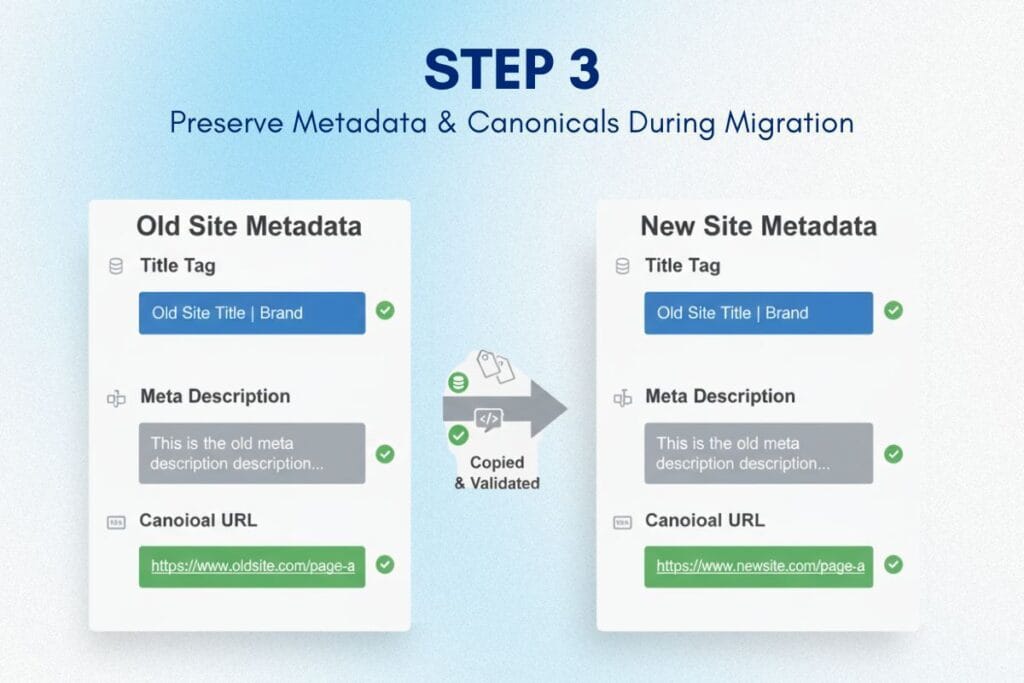
Step 3: How to Preserve Metadata and Canonical Tags During Platform Migration
Metadata, page titles, meta descriptions, header tags, alt text, and structured data are invisible to users but critical to search engines. Losing metadata during migration is like removing the labels from every product in your store. Google doesn't know what anything is anymore.
Pre-Migration Metadata Export
Export all metadata from your current site:
- Page titles (H1, title tags)
- Meta descriptions
- Alt text for images
- Open Graph tags (for social sharing)
- Canonical tags (which version of a URL is authoritative)
- Structured data (Product schema, BreadcrumbList, Organization, etc.)
Use Screaming Frog or a custom script. Export to a spreadsheet mapped to URLs.
Migrating Metadata to the New Platform
Most platforms don't automatically preserve metadata during migration. You'll need to:
- Manually input metadata for key pages (homepage, top products, major categories)
- Bulk import metadata using CSV or API for product catalogs
- Validate that structured data (schema) is correctly implemented in your new theme
Critical check: After migration, re-crawl the new site and compare metadata. Any missing or changed metadata needs immediate correction.
Canonical Tags: Preventing Duplicate Content Issues
Canonical tags tell Google which version of a page is the "master" when multiple URLs have similar content (e.g., product variants, filtered category pages).
Common canonical mistakes during migration:
- Canonical tags still pointing to old domain URLs
- Missing canonical tags on new pages
- Incorrect self-referential canonicals (page pointing to itself incorrectly)
Solution: Implement canonical tags in your new platform's theme templates. For Shopify Plus, this is typically handled automatically, but validate manually for custom pages and collections.
If your old site had complex canonical structures (regional sites, language variants), document them thoroughly and replicate them exactly in your website migration SEO checklist.
For technical guidance on canonical implementation, refer to Google's official documentation on consolidating duplicate URLs.
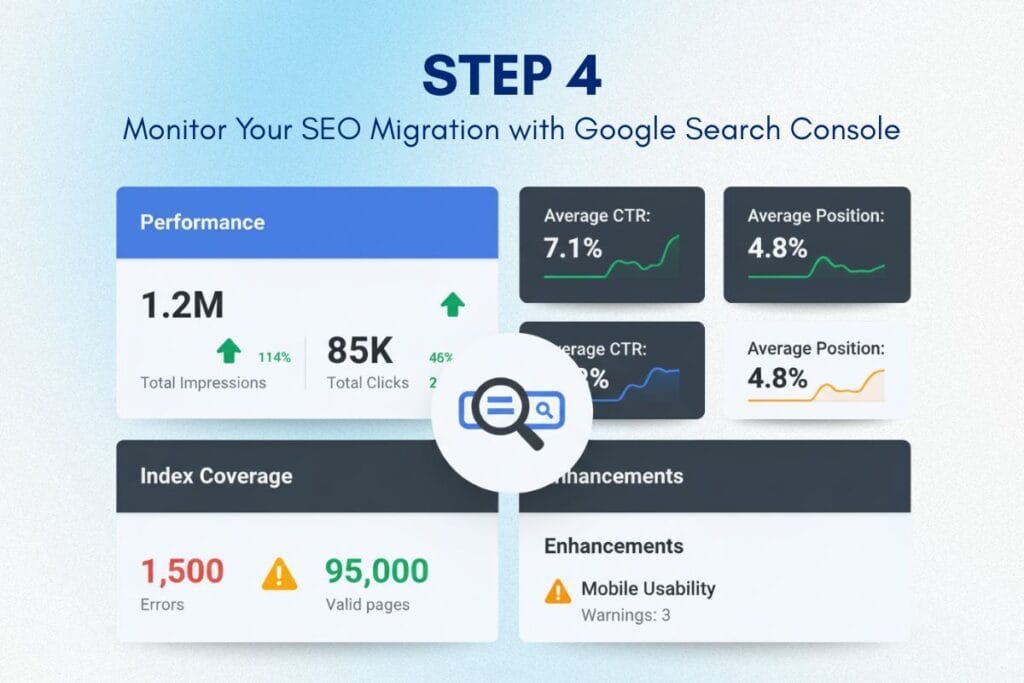
Step 4: Setting Up Google Search Console Monitoring Post-Migration
You can execute a perfect migration, but you won't know if it worked unless you monitor actively. Google Search Console is your real-time diagnostic tool for catching SEO issues before they tank your traffic.
Pre-Launch: Set Up New Property in Google Search Console
Before migration, add your new domain (or new URL structure) as a property in Google Search Console. Verify ownership using DNS verification (most reliable) or HTML tag verification.
Why early setup matters: Data takes 24–72 hours to populate in GSC. You want historical baseline data before launch so you can immediately spot deviations post-migration.
Post-Launch: Monitor These Key Metrics Daily (First 30 Days)
1. Index Coverage Report
Check for 404 errors, redirect errors, and server errors. Any spike indicates broken redirects or missing pages.
2. Core Web Vitals
Migration often changes page structure and speed. Monitor LCP (Largest Contentful Paint), CLS (Cumulative Layout Shift), and INP (Interaction to Next Paint) metrics using Google’s Core Web Vitals performance benchmarks to ensure your new platform maintains fast, stable page experiences. Degraded performance hurts rankings.
3. Search Performance (Impressions, Clicks, CTR)
Track weekly trends. A sudden drop in impressions = Google is deindexing pages. A drop in CTR = metadata issues (titles/descriptions don't match expectations).
4. Manual Actions
Check for penalties. Rare during clean migrations, but if you accidentally created doorway pages or cloaking, Google will flag it.
Fixing Issues Immediately (The 48-Hour Window)
When GSC flags an issue, fix it within 48 hours. The longer errors persist, the more Google penalizes your site.
Common post-launch fixes:
- Add missing redirects (if you discover indexed URLs you missed in initial mapping)
- Correct canonical tags pointing to the old domain
- Fix metadata that didn't migrate correctly
- Submit the updated sitemap to GSC to re-crawl new URLs faster
Use GSC's URL Inspection Tool to manually request re-indexing for critical pages after fixes.
Google Search Console is the single most important tool in your post-migration SEO migration checklist.
Common SEO Migration Mistakes That Tank Organic Traffic And How to Avoid Them.
Even teams following an SEO migration checklist make mistakes. Here are the most damaging and how to avoid them.
Mistake 1: Migrating Without Testing in Staging
Going live without staging validation is reckless. You're trusting that everything works perfectly. It won't.
Solution: Build the new site in a staging environment. Implement all redirects in staging. Crawl the staging site. Validate metadata, canonicals, and structured data. Only then go live.
Mistake 2: Redirecting All Old URLs to the Homepage
This happens when teams don't map URLs properly and take a shortcut: redirect everything to the homepage.
Google interprets this as a soft 404 (the page is gone). You lose all SEO value for those pages. Organic traffic craters.
Solution: Map every URL to its most relevant equivalent. If a page has no equivalent, redirect to the parent category or a related page, never the homepage unless absolutely necessary.
Mistake 3: Ignoring Mobile-First Indexing
Google indexes mobile versions of sites first. If your new site's mobile experience is broken (slow load times, poor UX, missing content), Google penalizes your rankings.
Solution: Test mobile performance thoroughly before migration. Use Google's Mobile-Friendly Test tool. Ensure Core Web Vitals pass on mobile devices.
Mistake 4: Forgetting to Update Internal Links
Your site has thousands of internal links pointing to old URL structures. If these don't update during migration, you create redirect chains or broken links.
Solution: Use find-and-replace in your CMS to update internal links in bulk. After migration, crawl the site and fix any internal links still pointing to old URLs.
Mistake 5: Not Monitoring for 90 Days Post-Launch
Teams often monitor for 7–14 days, see no issues, and stop watching. Then, weeks later, rankings drop and traffic declines.
Solution: Monitor Google Search Console, organic traffic (Google Analytics), and keyword rankings for at least 90 days post-migration. SEO impacts can be delayed.
How Long Does It Take to Recover Rankings After Migration?
If executed correctly with a comprehensive SEO migration checklist, most sites see minimal ranking disruption. Google re-crawls and re-indexes within 2–4 weeks. Rankings stabilize or improve within 60–90 days.
If executed poorly, recovery can take 6–12 months, or rankings never fully recover.
What "correctly" means:
- 100% of URLs redirected with 301s (no 404s)
- All metadata preserved or improved
- Canonical tags correct
- Structured data intact
- Google Search Console is monitored daily for the first 30 days
- Issues fixed within 48 hours of discovery
Sites that follow this process often see ranking improvements post-migration because the new platform (Shopify Plus, for example) has better performance (faster load times, mobile optimization) than legacy platforms like Magento or WooCommerce.
For context on how platform limitations impact SEO performance, review our analysis of WooCommerce scaling limits and their effect on site speed.
SEO Migration Checklist: Your Complete Pre-Launch, Launch, and Post-Launch Roadmap
Here's your actionable site migration SEO checklist broken into three phases:
Pre-Migration (4–6 Weeks Before Launch)
✅ Crawl the current site and export all URLs
✅ Map old URLs to new URLs (one-to-one)
✅ Export all metadata (titles, descriptions, alt text, schema)
✅ Document current canonical tag structure
✅ Set up new domain in Google Search Console
✅ Build staging environment with new platform
✅ Implement 301 redirects in staging
✅ Migrate metadata to new platform
✅ Validate redirects (test 100% of URLs)
✅ Check mobile performance and Core Web Vitals in staging
Launch Day (Go-Live)
✅ Deploy 301 redirects to production
✅ Update DNS to point to the new platform
✅ Submit new sitemap to Google Search Console
✅ Monitor Google Search Console for immediate errors
✅ Check top 20 pages manually (load correctly, metadata intact)
✅ Verify Google Analytics tracking is working
Post-Launch (First 90 Days)
✅ Monitor Google Search Console daily (first 30 days)
✅ Fix any 404 errors or redirect issues within 48 hours
✅ Track organic traffic trends weekly
✅ Monitor keyword rankings for the top 50 keywords
✅ Check Core Web Vitals monthly
✅ Update internal links pointing to old URLs
✅ Re-submit sitemap if major changes occur
This SEO migration checklist ensures nothing falls through the cracks.
Why Partner With PA Digital Growth for SEO-Safe Migration
Following this website migration SEO checklist is essential, but executing it flawlessly under pressure is different. One missed redirect. One metadata field doesn't import correctly. One canonical tag misconfiguration. Each can cost thousands in lost revenue.
PA Digital Growth specializes in SEO-safe migrations for e-commerce brands moving to Shopify Plus. Our process includes:
- Comprehensive pre-migration SEO audits
- 100% URL mapping and redirect validation
- Metadata preservation and schema implementation
- Google Search Console setup and post-launch monitoring
- 90-day SEO performance tracking with weekly reports
We've migrated dozens of stores without traffic loss, and many see ranking improvements post-migration due to platform performance gains.
If you're migrating from Magento, WooCommerce, or BigCommerce and SEO is critical to your revenue, we handle the technical complexity so you can focus on growth.
For strategic guidance on when migration makes sense for your business, review our complete e-commerce replatforming guide. To understand the financial case for migration, see our Magento to Shopify Plus TCO analysis. And if you're comparing platforms, our BigCommerce vs Shopify Plus feature comparison provides clarity on which platform best supports your SEO strategy.
Get Your Free SEO Migration Assessment
Protect Your SEO Equity. Don't Let Migration Tank Your Traffic
You've built your organic presence over the years. Don't let a poorly executed migration destroy it in weeks. A comprehensive SEO migration checklist isn't optional; it's the difference between a smooth transition and a revenue-destroying disaster.
If you follow this 4-step framework, URL mapping, 301 redirects, metadata preservation, and Google Search Console monitoring, you protect your rankings and position your new platform for even stronger SEO performance.
When the stakes are high, expertise matters. PA Digital Growth executes SEO-safe migrations daily. We know where migrations fail, how to prevent issues, and how to fix problems within the critical 48-hour window post-launch.
Ready to migrate without losing traffic? Book a free SEO migration assessment, and we'll audit your current site, identify risk factors, and build a custom migration plan that protects your organic revenue.
Schedule Your Free SEO Migration Strategy Call
Frequently Asked Questions
What is an SEO migration checklist and why do I need one?
An SEO migration checklist is a systematic plan that ensures your website maintains its search rankings, organic traffic, and SEO equity when moving to a new platform, URL structure, or domain. Without one, you risk broken redirects, lost metadata, crawl errors, and ranking drops that can cost 30–70% of your organic traffic overnight. A proper SEO migration checklist protects years of SEO investment by preserving URL structures, implementing 301 redirects correctly, and maintaining technical SEO signals Google relies on.
How do I create a 301 redirect map for website migration?
Create a 301 redirect map by crawling your current site with tools like Screaming Frog or Sitemap Generator, exporting all indexed URLs, mapping each old URL to its corresponding new URL in a spreadsheet, and implementing redirects via your new platform's redirect manager or .htaccess file. Every indexed page—product pages, blog posts, category pages, and images—should redirect to the most relevant equivalent on the new site, or to a relevant parent page if no exact match exists. Test redirects in staging before launch to catch errors early.
What are the most common SEO mistakes during website migration?
The most common SEO mistakes during website migration include incomplete 301 redirect mapping (missing pages that return 404 errors), lost metadata (titles, descriptions, alt text not transferred), broken internal links, incorrect canonical tags, noindex tags left in production accidentally, and failing to update XML sitemaps and robots.txt. Additionally, many teams forget to set up Google Search Console for the new domain/structure or skip post-launch monitoring, which allows ranking drops to go unnoticed for weeks. Each mistake compounds, often resulting in 40–60% traffic loss.
How long does it take for Google to recognize redirects after migration?
Google typically recognizes 301 redirects within 1–4 weeks, but full ranking stabilization can take 2–3 months depending on site size, crawl frequency, and technical execution quality. High-authority sites with frequent crawling may see faster recognition (7–14 days), while smaller sites or sites with crawl budget issues may take longer. During this period, rankings may fluctuate as Google re-evaluates page authority, processes redirects, and recrawls content—this is normal and expected with proper migration execution.
Should I use 301 or 302 redirects for SEO migration?
Always use 301 redirects for permanent website migrations because they pass 90–99% of link equity and signal to Google that the move is permanent. 302 redirects are temporary and do not pass full SEO value, which can result in the old URL staying indexed longer and the new URL not receiving proper authority transfer. Using 302 redirects during migration can cause ranking instability, delayed indexing of new URLs, and confusion in search engines about which version to rank.
How do I preserve metadata during ecommerce platform migration?
Preserve metadata by exporting all page titles, meta descriptions, alt text, and Open Graph tags from your current platform into a spreadsheet, mapping them to corresponding new URLs, and importing them into your new platform's bulk editor or CMS. For ecommerce migrations, prioritize product pages and high-traffic category pages first, as these drive the majority of organic revenue. Review metadata post-migration using crawl tools to identify any pages where metadata was lost or reverted to default templates.
What is Google Search Console migration validation and how do I use it?
Google Search Console migration validation involves setting up both the old and new properties in GSC, submitting updated XML sitemaps, monitoring the Coverage report for crawl errors (404s, redirect chains), and tracking organic traffic and ranking changes through the Performance report. You should also use the URL Inspection tool to verify that new URLs are being indexed correctly and old URLs show proper 301 redirect status. Validation catches issues like redirect loops, noindex tags, and canonical errors that would otherwise tank rankings silently.
How can I avoid losing backlinks during website migration?
Avoid losing backlinks by maintaining the same URL structure when possible, implementing comprehensive 301 redirects for every page with inbound links, and monitoring high-value backlinks using tools like Ahrefs or Moz to ensure they resolve correctly to new URLs. After migration, audit your backlink profile to identify any broken links pointing to old URLs without redirects, then add those redirects manually. Reach out to high-authority referring domains if critical links are broken and request URL updates where feasible.
What tools do I need for successful SEO migration?
Essential SEO migration tools include Screaming Frog (for site crawling and redirect testing), Google Search Console (for indexing monitoring and error detection), Google Analytics (for traffic tracking pre/post-migration), redirect mapping software (Excel/Google Sheets with VLOOKUP or specialized tools like Redirect Path), and rank tracking tools like SEMrush or Ahrefs to monitor keyword position changes. Advanced migrations also benefit from log file analyzers to track Googlebot crawl behavior and identify indexing delays or crawl budget issues.
How do I monitor SEO performance after website migration?
Monitor SEO performance post-migration by tracking organic traffic daily in Google Analytics (comparing week-over-week and year-over-year), checking Google Search Console Coverage and Performance reports for indexing errors and ranking drops, running weekly crawls to identify broken links or technical issues, and monitoring keyword rankings for your top 50–100 revenue-driving terms. Set up automated alerts for traffic drops exceeding 10%, sudden 404 spikes, or Core Web Vitals degradation. Active monitoring for 30–90 days post-launch catches issues before they become permanent ranking losses.